I recently decided I want to try self-re-learn Chinese via the standard HSK exam system after falling out of the rhythm of university language study and having a hiatus for a year and a half. This took me down the short but sweet journey of creating the perfect Anki deck.
If you haven't yet heard of Anki I'm not sure what you're doing. It's the golden standard when it comes to spaced repetition flash card tooling. A long time ago I tried to write my own, see: Mandarin Spaced-Repetition Tool but in the end I always ended up back in the arms of Anki.
One thing I love about it is its customisability, it basically runs a web browser so if you can write css html and javascript the sky is the limit.
Note this stuff is for personal use only, check the licences for anything you intend to web scrape, the legality changes from site to site, check the T&C's and generally don't republish unless permission is granted to do so.
Getting raw data
Most languages have a grade system for foreign learners, for Chinese its HSK (1 to 5), most European languages use the "Common European Framework of Reference for Languages" (A1-C2) etc etc. The main thing you need to know is if you want to make flash cards, a good place to start is a list of words ranked starting from "best to know". e.g. https://resources.allsetlearning.com/chinese/vocabulary/HSK_1_Vocabulary_(one_big_list)
Writing a web scraper for a table is trivial, I did it in bun using "happy-dom".
Start off by instantiating the document
tsconst window = new Window({url: url});
const document = window.document;

const res = await window.fetch(url)
const html = await res.text();
document.write(html)
Next we can run a query selector on the table and format it into a typescript interface
tsinterface CardData {
	chinese: string
	pinyin: string
	english: string
	hsk: string
	deck: string
	uuid: string
}

const outJSON = Array.from(document.querySelectorAll("table > tbody > tr"))
	.map(tr => {
		const children = Array.from(tr.children).map(u => u.innerHTML)
		return {
			chinese: children[0],
			pinyin: children[1],
			english: children[2],
			hsk: children[3],
			deck: `Chinese::${children[3]}`, // we'll come back to this
			uuid: crypto.randomUUID()
		}
	});

let outCSV = outJSON.map(card => Object.values(card).join("|")).join("\n");

Bun.write("./deck.csv", JSON.stringify(outCSV))
Leveraging Anki deck formatting
We can go ahead and import this csv file straight into Anki but to use the app to to its full potential we can utilise Anki's headers let us assign meaning to columns in Anki.
The main ones we want to use here are:
- seperator
- html
- notetype
- deck column
- guid column
Before we write the csv we prepend the headers (note they are 1 indexed)
tslet outCSV = `
#seperator:Pipe
#html:true
#notetype:My custom notetype
#deck column:4
#guid column:5
`

outCSV += outJSON.map(card => Object.values(card).join("|")).join("\n");
Bun.write("./deck.csv", JSON.stringify(outCSV))
The deck column is the real cool one here, in the last column we set the card's "deck" to Chinese::HSK x in Anki this will come up as a subdeck:
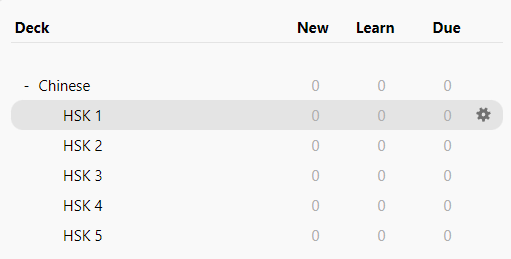
This is cool since we can study the individual levels but then when we're done we can review the entire thing as a whole (also it looks tidy).
Customising the notetype in Anki
There's two things I wanted to achieve here
- Custom fonts for the characters.
- Stroke order on the back of the card.
Adding a custom note type:
When you're in Anki you'll want to navigate to tools > manage note types
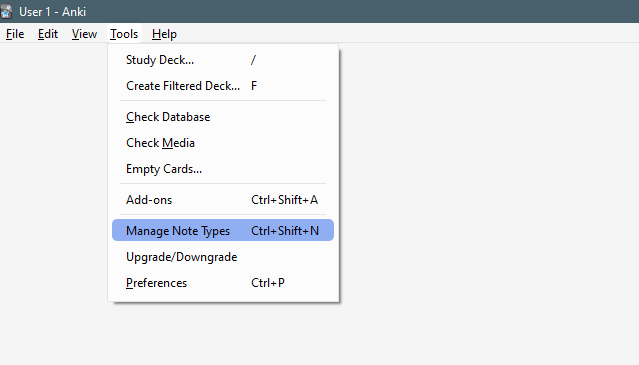
You can then add a new note type, call it whatever you put in your notetype csv header.
Select it and press "cards".
We're presented with 3 tabs:
- Front template
- Back template
- Styling
A HTML editor on the left and a previewer on the right. You'll notice Anki has a "fields" system e.g: {{SomeIdentifier}} read about them here: https://docs.ankiweb.net/templates/fields.html
Lets start by wrapping our card "Front" in a class so that we can add a custom font later.
html<!-- Front Template -->
<p class="front">{{Front}}<p/>
On the back template we're going to get a bit tricky, someone with a lot more time and knowledge of Unicode than I has created a JS module which can turn any Chinese character into an animated svg which shows stroke order, we'd be stupid not to use this.
html<!-- Back Template -->
{{FrontSide}}
<hr id=answer>
{{Back}}

<script src="https://cdn.jsdelivr.net/npm/hanzi-writer@3.5/dist/hanzi-writer.min.js"></script>

<div id="characters"></div>

<script>
	"{{Front}}".split("").forEach(c => {
		const d = document.createElement("div");
		const id = crypto.randomUUID()
		d.id = id
		document.getElementById("characters").appendChild(d)

		var writer = HanziWriter.create(`${id}`, c, {
			width: 100,
			height: 100,
			padding: 5,
			delayBetweenStrokes: 15,
			strokeAnimationSpeed: 2,
		});

		d.addEventListener("click", u => writer.animateCharacter())
	})
</script>
This back template basically splits the word into individual characters then creates a writer element for each which is in turn appended to our "#characters" div. By default this wont be styled correctly. This is where we go to our styling tab:
css...

#characters {
	display: flex;
	justify-content: center;
	cursor: pointer;
}
Now would be a good time to add our custom font. These are added the same way as regular webpage CSS fonts. One thing to note is that all assets including font files should be stored In the user profile's media folder, that will act as the file root.
I downloaded Kaiti (楷体) and added it to the user profile's media folder.
See here for more details: https://docs.ankiweb.net/templates/styling.html#installing-fonts
css@font-face {
	font-family: kaiti;
	src: url("Kaiti.ttf");
}

.front {
	font-family: kaiti;
	font-size: 80px;
}
Adding Flipped cards
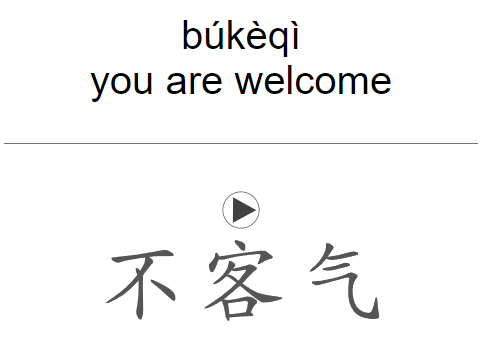
We can press the top right options button and select Add card type, this will create a new item in the topmost dropdown. We can select this and swap Front and Back in our templates. Now we have 2 cards per item, one shows the character and asks for pinyin+english and the other shows pinyin+english and asks for the character (I write the character down for these).
And now our cards should look like the following:
Finessing a few more tokens off of azure than they'd really like me to have for free.
You may have noticed the play button in the middle of my card, Anki lets you add audio, that looks like this in template syntax:
[sound:some-clip.wav]
where some-clip.wav is stored in the user profile's media folder
I wont go into too much detail here since its a bit out of scope. Essentially I took the absolute hardest route to get my 2.8k audio files for no reason other than I like to create fun programming problems for myself.
Modern web browsers have this thing called the SpeechSynthesisApi, I love this thing. You give it a string and it plays you back a sound, its also really easy to use.
tsconst utterance = new SpeechSynthesisUtterance("你好")
utterance.lang = "zh"
window.speechSynthesis.speak(utterance)
Loading voices
One thing to keep in mind is that this API is implemented very differently between browsers and that means the voice selection on offer, most offline capable TTS voices sound pretty robotic.
Something I found out by complete chance is that Edge gives you access to their premium current-gen TTS AI models for completely free using the voice synthesis API in that browser.
Enter the Screen Capture API
At a very surface level I:
- Collect an audio stream from the screen capture api
- Start a media recorder
- Hook a blob downloader (with the pinyin as a filename) to the media recorder stop callback
- Get edge to say the utterance, I made sure to use pinyin important as some characters have multiple pronunciations.
- Stop the media recorder.
- Repeat 2.8 thousand times :)
tsconst mediaStream = await requestStream()
for (let i = 0; i < data.length; i++) {
	const filename = `${data[i].pinyin}.wav`
	const phonemes = split(data[i].pinyin).join(" ") // uses a library
	const mediaRecorder = getMediaRecorder(mediaStream, (b: Blob) => downloadBlob(b, `${filename}`))

	mediaRecorder.start();
	await speakUtterence(phonemes, voice)
	mediaRecorder.stop();

	log = `${filename}  [${data[i].chinese}]  ${i}/${data.length}\n${log}`
	setStatus(log)
}
And that's kind of it, I left the script running overnight and then I dumped all the wav files in the media folder and indexed them via the pinyin. This is absolutely the hard way to do things, you're probably better off using an actual paid API for this but I had fun writing these scripts.
Bonus
Bonus 1:
Here's the download blob function for you :)
tsfunction downloadBlob(blob: Blob, filename: string) {
    const blobUrl = URL.createObjectURL(blob);
    const link = document.createElement('a');
    link.href = blobUrl;
    link.download = filename;
    document.body.appendChild(link);
    link.click();
    document.body.removeChild(link);
    URL.revokeObjectURL(blobUrl);
}
Bonus 2:
Sometimes the utterance takes a second or so to get going so a lot of these wav files have some dead air at the start which is a bit jarring when you expect them to start straight away in Anki.
This ffmpeg script will take all wav files in the current folder, trim the silence from the start and add them to an output folder.
shmkdir -p ./out
for f in *.wav; do
    BASENAME=$(basename $f)
    ffmpeg -y -hide_banner -loglevel error -i $f -af "silenceremove=start_periods=1:start_duration=0:start_threshold=-60dB:detection=peak" ./out/$BASENAME
done